Introduction
I am using Nginx Ingress Controller for my Kubernetes cluster, but I wanted to set up Traefik as well for specific use cases. This guide explains how I installed Traefik on my Kubernetes cluster using Helm.
Why I want to use Traefik
I want to use authentication features for my applications, and my Nginx Ingress Controller setup requires enabling allow-snippet-annotations and setting annotations-risk-level to Critical.
This is because Nginx Ingress Controller uses annotations for advanced configurations, which can be risky if not managed properly.
Traefik, on the other hand, does not require such risky configurations and provides a safer way to manage ingress rules and features. So I decided to switch to Traefik as my primary Ingress Controller.
Prerequisites
- A Kubernetes cluster (I am using a self-hosted cluster)
- Helm installed on your local machine
- Access to the Kubernetes cluster with sufficient permissions to install applications
- A domain name (I am using Cloudflare for DNS management)
Setup Guide
Step 1: Install Traefik using Helm
To install Traefik on my Kubernetes cluster, I used the following Helm command:
helm repo add traefik https://traefik.github.io/charts
helm repo update

helm upgrade --install traefik traefik/traefik \
  --namespace traefik \
  --set ports.web.redirections.entryPoint.scheme=https \
  --set ports.web.redirections.entryPoint.permanent=true \
  --set ports.web.redirections.entryPoint.to=websecure \
  --set service.type=ClusterIP
This command installs Traefik using Helm, a package manager for Kubernetes.
It sets up Traefik in the traefik namespace and configures it to redirect HTTP traffic to HTTPS. The service type is set to ClusterIP, which means it will only be accessible within the cluster.
Traefik Ports and Accessibility
| Port | Purpose | Accessibility |
|---|---|---|
| 8000 | HTTP (web) traffic | Cluster-internal |
| 8443 | HTTPS (websecure) traffic | Cluster-internal |
| 9100 | Metrics (monitoring) | Cluster-internal |
| 8080 | Traefik dashboard and API | By default Internally accessible only |
Step 2: Configure Cloudflare to use Traefik
Since we enabled websecure in the Traefik installation, you need to configure your DNS and SSL settings to use HTTPS for your domain.
In my case, I am using Cloudflare, so I will share the steps specific to Cloudflare below.
Step 2.1: Install Cloudflare Tunnel
sudo mkdir -p --mode=0755 /usr/share/keyrings
curl -fsSL https://pkg.cloudflare.com/cloudflare-main.gpg | sudo tee /usr/share/keyrings/cloudflare-main.gpg >/dev/null
echo "deb [signed-by=/usr/share/keyrings/cloudflare-main.gpg] https://pkg.cloudflare.com/cloudflared any main" | sudo tee /etc/apt/sources.list.d/cloudflared.list
sudo apt-get update && sudo apt-get install cloudflared
Step 2.2: Authenticate Cloudflare Tunnel
sudo cloudflared tunnel login
Don’t worry, if you see a login url in the server terminal, just copy it and paste it in your personal browser. After logging in, you will see a success message in the server terminal.
Step 2.3: Create a Tunnel
sudo cloudflared tunnel create <tunnel-name>
Example:
sudo cloudflared tunnel create traefik-ingress-tunnel
Once the tunnel is created, you will see a message with the tunnel ID and a certificate file path.
Example output:
vijay@controlplane:~$ cloudflared tunnel create traefik-ingress-tunnel
Tunnel credentials written to /root/.cloudflared/lmnop-0ce8-efgh-8c67-abcd.json. cloudflared chose this file based on where your origin certificate was found. Keep this file secret. To revoke these credentials, delete the tunnel.

Created tunnel traefik-ingress-tunnel with id lmnop-0ce8-efgh-8c67-abcd
You can check the list of tunnels created by running:
sudo cloudflared tunnel list
sudo cloudflared tunnel info traefik-ingress-tunnel
Copy the tunnel ID and certificate file path for later use. I would recommend renaming the certificate file to something more meaningful, like traefik-ingress-tunnel-credential.json.
sudo mkdir /home/vijay/.cloudflared && sudo chown vijay:vijay /home/vijay/.cloudflared && sudo chmod 700 /home/vijay/.cloudflared && sudo chmod 600 /home/vijay/.cloudflared/*
sudo cp /root/.cloudflared/lmnop-0ce8-efgh-8c67-abcd.json /home/vijay/.cloudflared/traefik-ingress-tunnel-credential.json
Step 2.4: Create a Kubernetes Secret for Cloudflare Tunnel Credentials
I am creating a secret in the cloudflare namespace, but you can create it in any namespace you prefer. Make sure to update the ConfigMap and Deployment accordingly.
Feel free to change the path to the credential file if you have it in a different location.
kubectl create namespace cloudflare

kubectl -n cloudflare create secret generic cloudflared-creds \
 --from-file=traefik-ingress-tunnel-credential.json=/home/vijay/.cloudflared/traefik-ingress-tunnel-credential.json
The next step is to create a ConfigMap with the Cloudflare Tunnel configuration.
Step 2.5: Create a Kubernetes ConfigMap for Cloudflare Tunnel
Since Cloudflare supports a single tunnel for multiple subdomains, you can use this setup to expose multiple applications without needing to create separate tunnels for each one.
For example, any subdomain under *.yourdomain.com will be routed to the Traefik service in your cluster, allowing you to access your applications securely over HTTPS. Here is how to acheive that:
# cloudflared-config.yaml
apiVersion: v1
kind: ConfigMap
metadata:
  name: cloudflared-config
  namespace: cloudflare
data:
  config.yaml: |
    tunnel: traefik-ingress-tunnel
    credentials-file: /etc/cloudflared/creds/traefik-ingress-tunnel-credential.json
    ingress:
      - hostname: '*.yourdomain.com'
        originRequest:
          noTLSVerify: true
        service: https://traefik.traefik.svc.cluster.local:443
      - service: http_status:404
Explanation:
tunnel: The name of the tunnel you created.credentials-file: Don’t be confused with the path to the credential file, this is the path inside the container where the credential file will be mounted.ingress: This section defines the routing rules for the tunnel.hostname: The domain or subdomain you want to expose. Replaceyourdomain.comwith your actual domain.originRequest.noTLSVerify: Set to true to skip TLS verification for the service.service: The internal service URL that Cloudflare will route traffic. In this case, it points to the Traefik service in thetraefiknamespace working on port 443.http_status:404: This is a catch-all rule that returns a 404 status for any unmatched requests.
Step 2.6: Create Deployment for Cloudflare Tunnel
# cloudflared-deployment.yaml
apiVersion: apps/v1
kind: Deployment
metadata:
  name: cloudflared
  namespace: cloudflare
spec:
  replicas: 1
  selector:
    matchLabels:
      app: cloudflared
  template:
    metadata:
      labels:
        app: cloudflared
    spec:
      containers:
        - name: cloudflared
          image: cloudflare/cloudflared:2025.6.1 # check and use the latest version
          args: ["tunnel", "--config", "/etc/cloudflared/config.yaml", "run"]
          volumeMounts:
            - name: config
              mountPath: /etc/cloudflared/config.yaml
              subPath: config.yaml
            - name: creds
              mountPath: /etc/cloudflared/creds
      volumes:
        - name: config
          configMap:
            name: cloudflared-config
        - name: creds
          secret:
            secretName: cloudflared-creds
Explanation:
args: The command to run the Cloudflare Tunnel with the specified configuration file.volumeMounts: Mounts the ConfigMap and secret containing the Cloudflare Tunnel configuration and credentials. This is the path above ConfigMap uses/etc/cloudflared/creds/traefik-ingress-tunnel-credential.json.
Step 2.7: Apply the ConfigMap and Deployment
kubectl apply -f cloudflared-config.yaml
kubectl apply -f cloudflared-deployment.yaml
Make sure your Secret, ConfigMap, and Deployment are in the same namespace or adjust the commands accordingly. Otherwise, your Deployment won’t be able to access the ConfigMap and Secret.
That’s it! You have successfully set up Cloudflare Tunnel to route traffic to your Traefik Ingress Controller in your Kubernetes cluster.
Step 2.8: CNAME Configuration in Cloudflare
Go to your Cloudflare dashboard and navigate to the DNS settings for your domain. Create a CNAME record for the subdomain you want to expose, pointing it to *.yourdomain.com.
In the Target field, enter the tunnel-id.cfargotunnel.com
Example: lmnop-0ce8-efgh-8c67-abcd.cfargotunnel.com
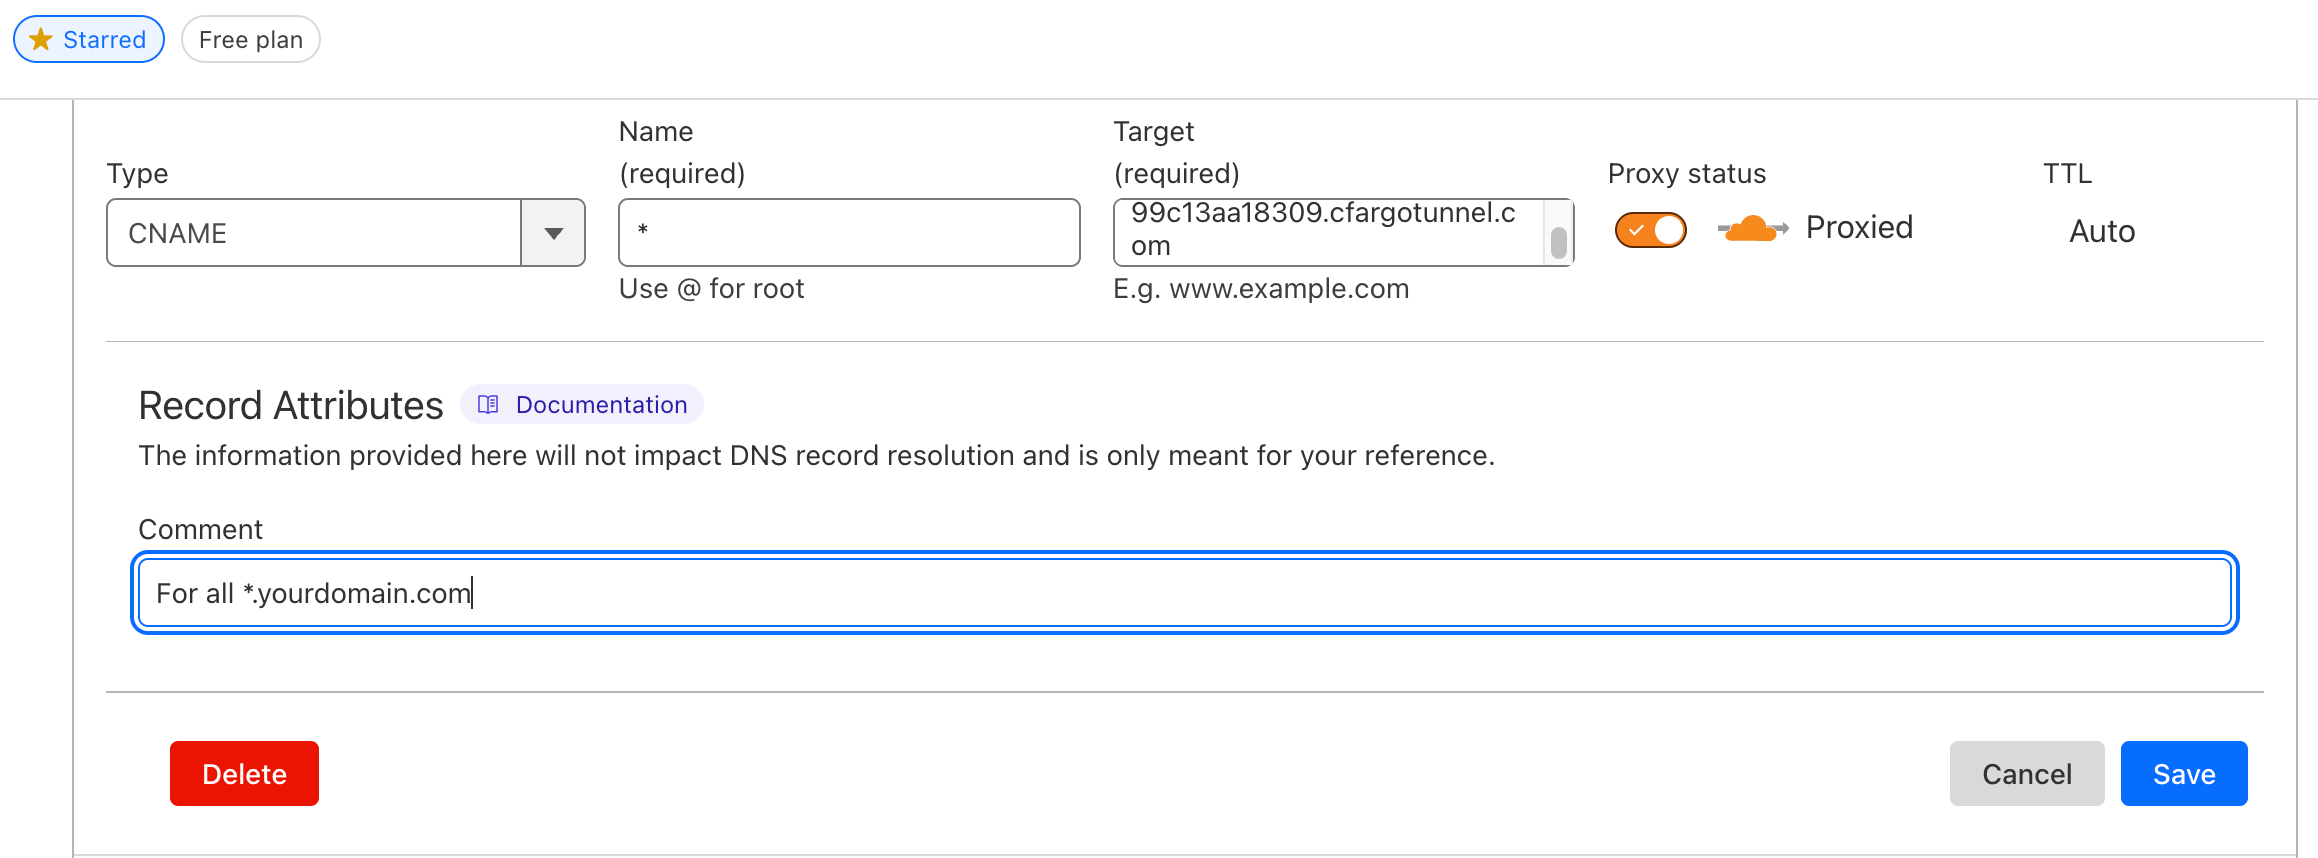
Without this step, the Cloudflare Tunnel won’t be able to route traffic to your application.
Step 3: Verify the Setup with Sample Application
Step 3.1: Deploy a Sample Nginx Application
Let’s deploy nginx as a sample application to verify that everything is working correctly.
kubectl create namespace nginx
kubectl create deployment nginx --image=nginx:alpine --namespace=nginx
kubectl expose deployment nginx --port=80 --target-port=80 --type=ClusterIP --name=nginx --namespace=nginx
Verify that the nginx service is running:
kubectl get all -n nginx
You should see the nginx pod and service running in the nginx namespace.
Step 3.2: Create Traefik IngressResource for Nginx
# nginx-ingressroute.yaml
apiVersion: traefik.io/v1alpha1
kind: IngressRoute
metadata:
  name: nginx-ingress
  namespace: nginx
spec:
  entryPoints:
    - websecure
  routes:
    - kind: Rule
      match: Host(`nginx.yourdomain.com`)
      services:
        - kind: Service
          name: nginx
          namespace: nginx
          port: 80
Apply the IngressRoute:
kubectl apply -f nginx-ingressroute.yaml
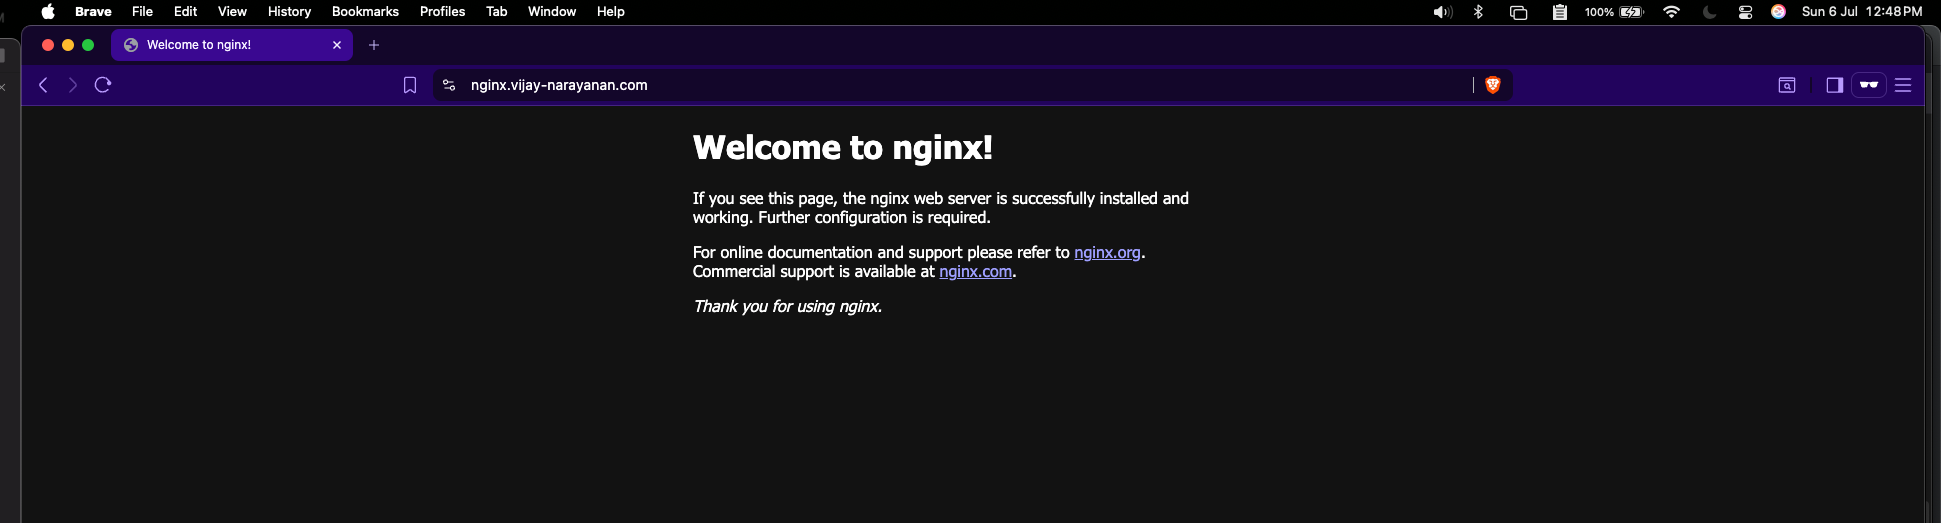
Step 3.3: Access the Nginx Application
Now, you can access the nginx application using the domain you configured in the IngressRoute. Open your browser and navigate to https://nginx.yourdomain.com.
If everything is set up correctly, you should see the default Nginx welcome page.
Conclusion
We configured Traefik as an Ingress Controller in our Kubernetes cluster and set up Cloudflare Tunnel to route traffic securely to our applications.