Introduction
This guide shows you how to set up a secure and flexible Proxmox VE homelab. You will:
- Isolate your VM network but keep internet access.
- Securely access the Proxmox web UI using Cloudflare Tunnel and custom DNS.
- Block direct IP access to the Proxmox UI.
- Prepare for adding more services in the future.
Prerequisite
Before you start, ensure you have:
- Already installed Proxmox VE on your machine.
- A basic understanding of Linux command line.
- A Cloudflare account with a domain set up (e.g.,
yourdomain.com).
Example values we are going to use
Assuming you have a Proxmox VE installation with the following network configuration: Note that these values are examples; you should replace them with your actual network settings.
- LAN IP:
10.20.30.40/24 - Gateway/DNS:
10.20.30.1 - Hostname:
homelab.yourdomain.com - Domain:
yourdomain.com(Cloudflare-managed)
Step 1: Initial Proxmox VE Setup
apt-get update
apt-get upgrade
0.0 Open /etc/hostname and set the following entry:
You can use any hostname you prefer, but for this guide, we will use: homelab
homelab
0.1 Open and check values for /etc/hosts:
127.0.0.1 localhost.localdomain localhost
10.20.30.40 homelab.yourdomain.com homelab

# The following lines are desirable for IPv6 capable hosts

::1     ip6-localhost ip6-loopback
fe00::0 ip6-localnet
ff00::0 ip6-mcastprefix
ff02::1 ip6-allnodes
ff02::2 ip6-allrouters
ff02::3 ip6-allhosts
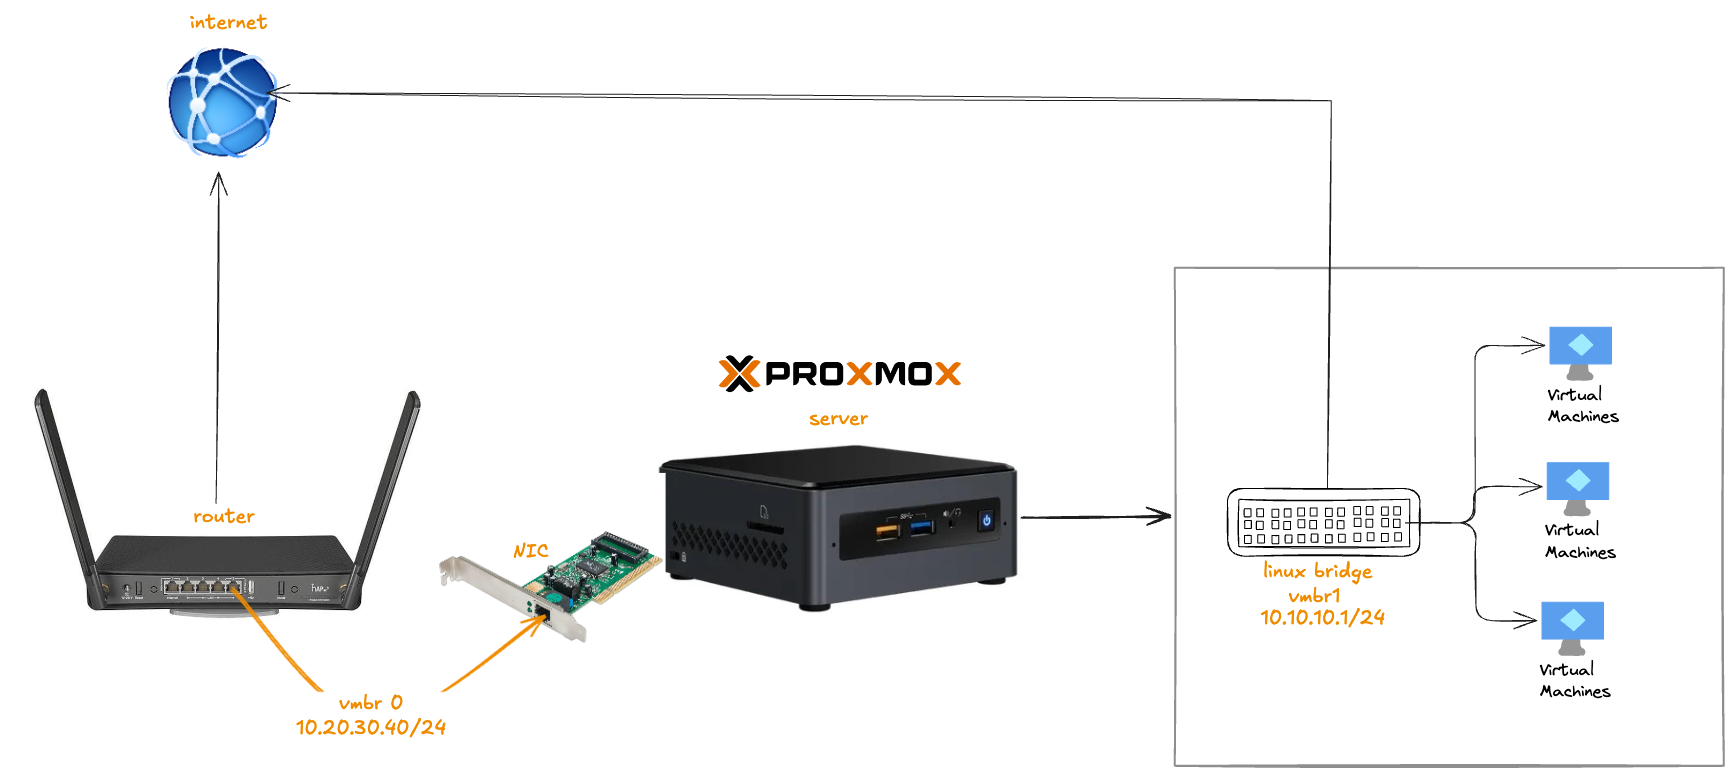
Part 1: Isolate your VM network but keep internet access.
If you want your Proxmox and its VMs on an isolated internal virtual network, but still able to access the internet. Follow these steps:
Step 1.1: Network Plan
Use Proxmox’s Linux bridges for VM/Container networks.
vmbr0: Connected to physical NIC (eno1) — your main interface (10.20.30.40)vmbr1: Internal-only isolated virtual bridge (no physical NIC attached)- Configure NAT for
vmbr1to allow internet for VMs while keeping them isolated
Step 1.2: Create NAT Bridge (Isolated VM Network)
Edit /etc/network/interfaces:
auto lo
iface lo inet loopback

iface enp3s0 inet manual

auto vmbr0
iface vmbr0 inet static
        address 10.20.30.40/24
        gateway 10.20.30.1
        bridge-ports enp3s0
        bridge-stp off
        bridge-fd 0
        dns-nameservers 10.20.30.1

auto vmbr1
iface vmbr1 inet static
        address 10.10.10.1/24
        bridge-ports none
        bridge-stp off
        bridge-fd 0
        post-up echo 1 > /proc/sys/net/ipv4/ip_forward
        post-up iptables -t nat -A POSTROUTING -s '10.10.10.0/24' -o vmbr0 -j MASQUERADE
        post-down iptables -t nat -D POSTROUTING -s '10.10.10.0/24' -o vmbr0 -j MASQUERADE

iface enp2s0 inet manual

iface wlp4s0 inet manual

source /etc/network/interfaces.d/*
Then run to apply the changes
ifreload -a
Now, your VMs on vmbr1 can access the internet but are not exposed to your LAN.
Part 2: Secure Remote Access via Cloudflare Tunnel
To expose the Proxmox UI (8006) securely via your domain, use Cloudflare Tunnel (cloudflared). No port forwarding is needed.
Step 2.1: Install cloudflared on Proxmox
wget https://github.com/cloudflare/cloudflared/releases/latest/download/cloudflared-linux-amd64.deb
sudo dpkg -i cloudflared-linux-amd64.deb
Step 2.2: Authenticate with Cloudflare
cloudflared tunnel login
Follow the browser instructions. Select your domain: yourdomain.com.
Step 2.3: Create the Tunnel
cloudflared tunnel create proxmox-tunnel
This gives a tunnel UUID like a1b2c3d4...
Step 2.4: Configure the Tunnel
Create /etc/cloudflared/config.yml:
tunnel: a1b2c3d4...         # from previous step
credentials-file: /root/.cloudflared/875fc262-b752-46cf-958d-86f35815deed.json  # from previous step

ingress:
  - hostname: homelab.yourdomain.com
    service: https://localhost:8006
    originRequest:
      noTLSVerify: true
  - service: http_status:404
Step 2.5: Route DNS in Cloudflare
Run below command. This will create a DNS record in Cloudflare for your tunnel.
cloudflared tunnel route dns proxmox-tunnel homelab.yourdomain.com
Step 2.6: Run the Tunnel as a Service
cloudflared service install
systemctl enable --now cloudflared
Now, only users with access to homelab.yourdomain.com via Cloudflare can access your Proxmox UI.
Step 2.7: Block IP Access to https://<your-proxmox-ip>:8006
We’ll achieve this using Proxmox firewall rules using iptables.
Use iptables (if you don’t want to use Proxmox firewall)
Run the following:
iptables -A INPUT -p tcp --dport 8006 ! -s 127.0.0.1 -j DROP
To persist this:
- Install iptables-persistent:
apt install iptables-persistent
- Save rules:
iptables-save > /etc/iptables/rules.v4
Verify It Works
Now try:
https://<your-public-LAN-IP>:8006→ Should fail (connection refused or timeout)https://homelab.yourdomain.com→ Should work perfectly
Summary
| Goal | Setup Summary |
|---|---|
| Isolated network with internet | Create vmbr1, apply NAT masquerading via vmbr0 |
| Secure remote Proxmox access | Use Cloudflare Tunnel and custom DNS (homelab.yourdomain.com) |
| Block access via IP/Port | web UI to 127.0.0.1:8006 should be blocked |